Kelco Garland Machine
ITEM #: KMG1
TABLE OF CONTENTS
| 1. |
General Information |
| 2. |
Packing
List |
| 3. |
Assembly Instructions |
| 4. |
Operating Instructions |
| 5. |
Maintenance |
| 6. |
Warranty |
| 7. |
Parts List |
1. GENERAL INFORMATION
The purpose of this manual is to assist the operator in assembling, operating, and maintaining the Kelco Garland Machine. Read it carefully. It furnishes information and instructions that will help you achieve years of dependable performance.
The information in this manual was current at time of printing. Due to possible engineering changes your machine may vary slightly in detail. KELCO Industries reserves the right to design and change the machine as may be necessary without notification.
2. PACKING LIST
| 1 ea. | Twine Guide Assembly |
| 1 ea. | Table Clamp Assembly |
| 1 ea. | Saddle Assembly |
| 3 ea. | Cap Screws |
| 3ea. | Lock Washers |
| 1ea. | Set of Hardware; including (1 spring, 2 washers, 1 spacer, 1 wing-nut, 1 roll of green spool wire) |
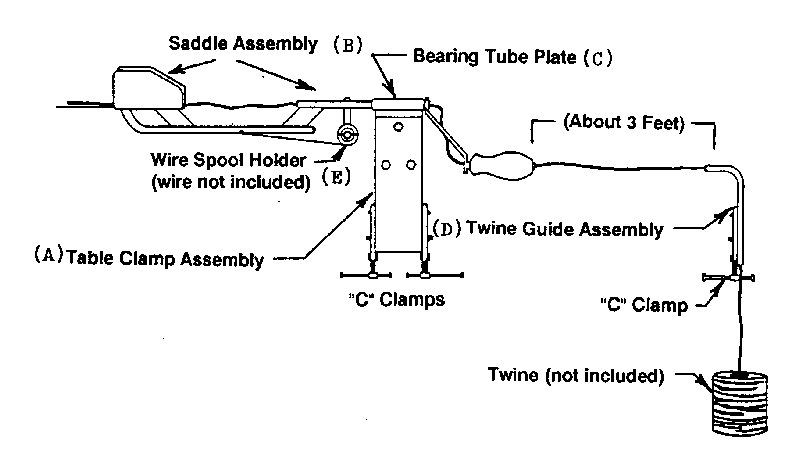
3. ASSEMBLY INSTRUCTIONS
| 1. | Clamp Table Clamp Assembly (A) to table top in front of you with the "C" Clamps. |
| 2. | Place lock-washers on cap screws and insert bolts through holes in Table Clamp Assembly (A) into the Saddle Assembly (B). The Bearing Tube Plate (C) should be in front of the Table Clamp Assembly (A). |
| 3. | Fasten cap screws into corresponding holes in Bearing Tube Plate (C). Note: Be sure the handle is on the right side. When all three bolts are in place, tighten them with 7/16" wrench. |
| 4. | Clamp the Twine Guide Assembly (D) to the table top about three feet away from the end of the Table Clamp Assembly (A) on the same side as the handle (right side). |
| 5. | Place the spool of wire on the Wire Spool Holder (E) so the wire feeds off the bottom of the spool and replace the washers, spring and wing nut in this order: spool, washer, spring, washer, space, wing nut. |
| 6. | Thread the twine and wire through the Kelco Garland Machine as shown in diagram below. |
4. OPERATING INSTRUCTIONS
| 1. | To put a spool of wire on your Kelco Garland Machine, remove the wing nut, spacer, washers, and spring from the Wire Spool Holder (E) and slide the spool of wire on the spindle so that the wire feeds from the bottom of the spool. Replace, in order, one washer, the spring, second washer, the spacer and the wing nut. Thread the wire from the spool through the hole in the long tube of the Saddle Assembly (B) as shown in the diagram on previous page. The wire will come out of the hole where the long tube meets the saddle. |
| 2. | To thread twine on your Kelco Garland Machine, place a ball of twine on the floor below the Twine Guide Assembly (D) and feed it up through the Twine Guide Assembly (D). Continue to thread twine through the handle, Bearing Tube Plate (C), and over the saddle, as shown in diagram. |
| 3. | Make a small bouquet of greens you will make into garland (1 to 3 boughs). Hold bouquet in your left hand on the saddle of your Kelco Garland Machine with the stems pointing toward the handle and extending about 2 inches beyond the saddle. Grasp the ends of the wire and twine with your left hand, while continuing to hold the bouquet of greens in that hand. |
| 4. | Holding bouquet, the wire and the twine in your left hand, turn the handle of your Kelco Garland Machine with your right hand making a couple wraps of wire to hold the bouquet of greens to the twine. It does not matter which direction you turn the handle, but you should turn it in the same direction. You should not let the twine wrap around the greens. |
| 5. | Advance the garland 2 to 4 inches by pulling the greens, wire and twine to the left with your left hand. |
| 6. | Repeat steps 3, 4 and 5 to continue making your garland. |
| 7. | After a little practice you will be able to make your garland as heavy or light, and as thick or thin, as you require. Make the garland lighter either by reducing the number of boughs in each bouquet or by advancing the garland further after wrapping each bouquet. |
| 8. | Adjust the wire tension periodically to get the proper degree of tension. Test for proper tension by making a test length of garland and seeing if the wire is holding the greens tight enough to insure they can not be easily pulled loose. Be careful not to set the tension too high, or the wire may cut through the boughs. |
5. MAINTENANCE
The Kelco Garland Machine needs to be oiled to keep it running
smoothly. Put a few drops of a light, all purpose oil (such as 3-in-1 oil)
through the small lubricating holes located in the top of Bearing Tube Plate
(C).
The frequency of maintenance depends on usage. If machine is used all day,
every day, it should be oiled at least once a week. The Kelco Garland Machine
should be oiled before storage.
6. WARRANTY
Your Kelco product is sent to you directly from our factory.If you should have any problems that can not be resolved with your machine by the enclosed literature, call us at 1-800-343-4057. If it cannot be corrected we will send you a new machine.
7. PARTS LIST
| KMG1-SP | Spacer for Garland Machine |